Wazuh
Description
Wazuh is an open-source security platform that provides both XDR and SIEM protection for endpoints and cloud workloads. It combines endpoint security, threat intelligence, security operations, and cloud security into a single agent and platform architecture. Being open-source gives Wazuh the advantage of being flexible, scalable, with no vendor lock-in, no license cost, and large community support.
Server setup
On my Raspberry Pi, I downloaded and installed the Wazuh installation assistant:
I then created a reverse proxy host for https://wazuh.ts.mydomain.com that redirects to the Wazuh web UI via Tailscale. From here, I can access the Wazuh dashboard and monitor my systems (Agents).

Wazuh dashboard
Agent deployment
DigitalOcean Droplet agent deployment
Pre-deployment
Before deploying the Wazuh agent on the VPS, I want to ensure that it can communicate with the Pi server over the Tailscale tunnel. This is a security measure intended to prevent portforwarding on both systems. In order for this to work, I added ACLs to the Tailscale configuration that allows the Droplet to send TCP traffic to the Pi server over ports 1514, 1515, and 55000 used by Wazuh:
{
    "grants": [
        // DNS
        ...
        // HTTP/HTTPS
        ...
        // SSH
        ...
        // Wazuh
        {
            "src": ["<VPS_TS_IP>"],
            "dst": ["<PI_TS_IP>"],
            "ip":  ["tcp:1514", "tcp:1515", "tcp:55000"],
        },
    ],
}
Deployment
I then completed the following steps to deploy a new agent on a Debian-based host:
-
Open the Wazuh console and click on the button that says Deploy a new agent.
-
On the next screen, provide your system information and execute the installation command provided to you on the agent system:
-
Once finished, run these commands to enable the Wazuh Agent system service:
-
Lastly, run these commands on both the server and client, so as to prevent Wazuh updates from breaking the configuration:

DigitalOcean Droplet agent is active
Windows agent deployment
The Wazuh agent deployment process for Windows systems is as follows:
-
Open the Wazuh console and click on the button that says Deploy a new agent.
-
On the next screen, provide your system information and copy the installation command. It should look something like this:
Invoke-WebRequest -Uri https://packages.wazuh.com/4.x/windows/wazuh-agent-4.13.1-1.msi -OutFile $env:tmp\wazuh-agent; msiexec.exe /i $env:tmp\wazuh-agent /q WAZUH_MANAGER='wazuh.ts.mydomain.com' WAZUH_AGENT_GROUP='default' WAZUH_AGENT_NAME='host'I then ran this command in the Windows PowerShell terminal.
-
Then, use the following command to start the Wazuh agent service:
-
Open the Wazuh Agent application on Windows to verify that it's running:

Windows 11 agent is active The Windows agent should now appear on the Wazuh dashboard.
Wazuh configuration
File Integrity Monitoring
File Integrity Monitoring (FIM) is a module in Wazuh used to monitor detect and alert on changes to the filesystem. To enable FIM on the server's /home/ras/Downloads directory, I added the following line to the ossec.conf file:
  <!-- File integrity monitoring -->
  <syscheck>
    <disabled>no</disabled>

    <directories>/home/ras/Downloads</directories>
Then, I saved the file and restarted the Wazuh manager service for the changes to take effect:
Testing
I then executed the following command to create and delete a test file:
From the Wazuh dashboard, I went to the File Integrity Monitoring -> Events pane. Notice the two events that were created:
| timestamp | agent.name | syscheck.path | syscheck.event | rule.description | rule.level | rule.id |
|---|---|---|---|---|---|---|
| Jan 18, 2026 @ 02:23:42.665 | pi | /home/ras/Downloads/test |
deleted | File deleted. | 7 | 553 |
| Jan 18, 2026 @ 02:23:38.734 | pi | /home/ras/Downloads/test |
added | File added to the system. | 5 | 554 |
Enable real-time monitoring
Initially, the events did not appear because FIM does not monitor filesystem changes in real-time by default. To fix this, I made a minor adjustment to ossec.conf:
config title="/var/ossec/etc/ossec.conf"
  <!-- File integrity monitoring -->
  <syscheck>
    <disabled>no</disabled>

    <directories realtime="yes">/home/ras/Downloads</directories>
The realtime attribute ensures that filesystem changes are tracked immediately as they occur.
Ignored directories
Suppose I want to monitor the entire /home directory on the Droplet agent. When not configured properly, this could quickly fill up FIM's file database with unnecessary entries. Prevent this by instructing FIM to ignore known noisy directories in the agent's own ossec.conf:
<ossec_config>

  <!-- File integrity monitoring -->
  <syscheck>
    <directories realtime="yes">/home</directories>

    <ignore>/home/droplet/dir1</ignore>
    <ignore>/home/droplet/dir2/subdir/subdir2</ignore>
    <ignore>/home/droplet/dir3/subdir</ignore>

</ossec_config>
I then restarted the wazuh-manager service on the server and the wazuh-agent service on the agent to push the changes:
Increase the file limit
When monitoring my Pi's large filesystem, I decided it was best to increase the max amount of file entries that FIM can store in its database. I did this by modifying the following line in the server's ossec.conf file:
    <file_limit>
      <enabled>yes</enabled>
      <entries>500000</entries>
    </file_limit>
Integrations
VirusTotal
This integration allows Wazuh to leverage VirusTotal's scanning platform for malware detection. Combined with FIM monitoring filesystems in real-time, it extends Wazuh's XDR capabilities.
To integrate VirusTotal scanning with Wazuh, add the following to the server's ossec.conf file:
<ossec_config>
   <integration>
     <name>virustotal</name>
     <api_key>VT_API_KEY</api_key>
     <group>syscheck</group>
     <alert_format>json</alert_format>
   </integration>
</ossec_config>
It is also important to ensure that FIM can record file hashes, since this data is crucial for VirusTotal to match files against known malware signatures:
<directories check_all="yes" realtime="yes">/home</directories>
Info
Add these attributes to the agent's ossec.conf too.
Go to the Wazuh dashboard, then Malware Detection -> Events to view the latest VirusTotal scans.
| timestamp | agent.name | data.title | rule.description | rule.level | rule.id |
|---|---|---|---|---|---|
| Jan 20, 2026 @ 22:35:28.608 | pi | - | VirusTotal: Alert - /home/ras/Downloads/test - No positives found |
3 | 87104 |
Note
The VirusTotal Public API is limited to 500 requests per day and a rate of 4 requests per minute.
CIS Benchmarks
Wazuh integrates CIS Benchmarks into its Security Configuration Assessment (SCA) module for continuous secure configuration enforcement. Periodic scans and real-time endpoint monitoring map findings to PCI-DSS, HIPAA, and NIST controls for comprehensive governance, risk, and compliance (GRC).
CIS Microsoft Windows 11 Enterprise Benchmark
Click on Endpoints, then click on the Windows agent. A CIS Benchmark scan should have started automatically.
Once the scan has completed, review the results to see what vulnerabilities there are on your system. Your score should be somewhere around 30%, which is to be expected:
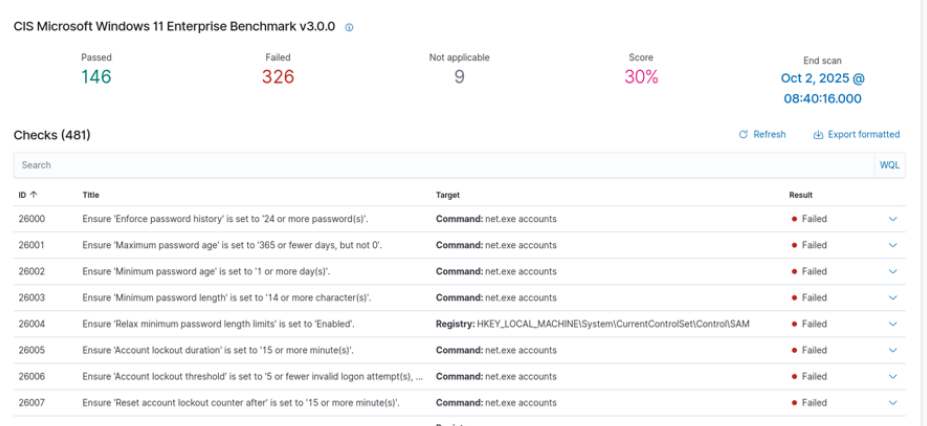
CIS Microsoft Windows 11 Enterprise Benchmark results
These checks ensure that the system is compliant with CIS standards, and include controls such as setting the most secure password length.
Clicking on a control test expands a panel showing the rationale for the control, the remediation process, a policy description, and more information. For instance, here you can see the registry values that were checked and how to remediate failed control checks by creating specific entries in the Windows Registry Editor:

Also notice the information found under Compliance referencing controls from each framework.
CIS Distribution Independent Linux Benchmark
Go back to Endpoints and click on a Linux agent. Look over the CIS Benchmark results. This time, I will show you an example of how to manually remediate a failed control check.

Manual remediation
Open the related file in a text editor:
Copy and paste the following lines and write the changes to the file:-w /var/log/faillog
-p wa
-k logins
-w /var/log/lastlog
-p wa
-k logins
-w /var/log/tallylog
-p wa
-k logins
This ensures that login and logout events are collected, thus remediating the failed control check.